To switch off the Meet and Hangout menus on the left select Off for Google Chat (Hangout) and Hide the Meet section in the main menu.
Wednesday, January 19, 2022
Helpful hints for Gmail users
To switch off the Meet and Hangout menus on the left select Off for Google Chat (Hangout) and Hide the Meet section in the main menu.
Tuesday, November 17, 2020
A Simple FREE security tip for Windows 10
I want to share a simple setup change to make your Windows 10 computer more secure.
Windows 10 is very secure with built-in firewall and anti-virus protection, but a potential danger is that the default setup means the user has administrator privileges. The danger here is that software can be loaded without the user giving permission. For example the user gets an email with an attachment which they think is a document, but it turns out to be a program like ransomware which is going to encrypt all their files and start deleting them until they pay a ransom. They double click on the 'document' expecting it to open when instead the ransomware software is installed on the computer.
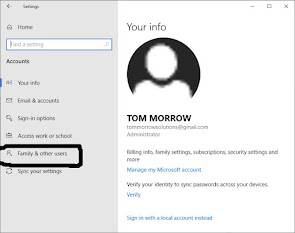
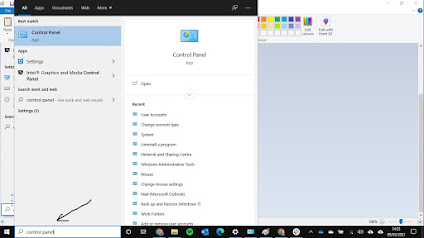
To make sure this can't happen the simple solution is to have 2 accounts on your computer: An admin account and a standard user account which you use everyday. The only time you need to use the admin account or type in the admin password is when you are installing software, an upgrade or making a major change to your computer. You will know you are doing this, so expect to have to use the admin password. At any other time you have the added security of having to input the admin password and you can ask yourself why (or an IT support person like myself!).
So I am going to show you how to setup an admin account on your Windows 10 computer.
Monday, January 4, 2016
Using IKEA Sliding doors
So IKEA sliding doors come in 2 height sizes, 201cm and 236cm and 150cm and 200cm widths. My concern when fitting was the height the fittings need to go to for my own design. I went for the 201cm high doors because of the restrictions in the high of the rooms I was fitting them in.
So the important measure I needed was 1925mm from the top of the bottom rail to the top of the top rail. See picture below.
Wednesday, October 14, 2015
Netgear Router Firmware Upgrade
This blog post has been prompted by the news that some Netgear routers have security issues and therefore the company are releasing an upgrade to the firmware in order to fix the problem.
Models affected are JNR1010v2, JNR3000, JWNR2000v5, JWNR2010v5, N300, R3250, WNR2020, WNR614, WNR618. To check your router model look on the router base or once you login into the router the model number will be stated on the admin screen.
Even if your model is not affected, doing an upgrade to the firmware is a good idea as it often fixes problems or security issues.
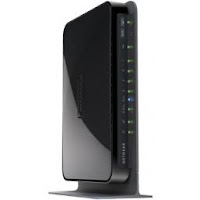
For those of you not sure what a router is it is the device that you use to connect you to the internet. Netgear is a brand and will look something like this image below and will usually say Netgear on it.
Initially you need to log in to your router. To do this open a web browser (like Chrome, Firefox or Internet Explorer) and in the address bar at the top type 192.168.1.1 (this is the usual 'IP address') and press return. Another window will appear where you need to enter the User name and Password. The default user name is admin and the password is password.
You should now be in the routers admin area and newer models will have a screen similar to the image below. If the router needs an upgrade there will be a message across the top saying "A new firmware upgrade is available. Click here to get it". Click on the message and it will take you to the upgrade area where you can select upgrade.
Sunday, January 25, 2015
AVG Anti-Virus Update
After you click Update now another screen will appear. This screen will have pre-selected 'Ultimate protection' (as shown below). You may not want this as is it costs you, so you have to decide whether you really want to pay. AVG give you a free 30 day trial of this if you want to try it and it is not too difficult to down grade to the Basic version at a later stage. Personally I have found the Basic version adequate for my needs.
So if you want to stay with the Basic version, select Basic protection (as shown below) and continue installing the update.
Sunday, August 10, 2014
Slow Computer/Low memory
In this example you can see under Physical Memory it says 4085 which means the computer has 4GB and above that in the graphic display of memory you can see it is using 2.90 GB. If this graph shows it is using near the maximum or at maximum then the computer will run slow.
You can close programs down to see if it makes a difference. Start by looking at the Applications tab and close any programs that you are not using.
We now need to look at programs that are running in the 'background' which are initiated on startup. To do this you will need to download and install a program called CCleaner from http://www.piriform.com/ccleaner/download. Just download the free version and install!
After installing it will give you the option of running the program. When you run the program you can select Tools and Startup to show you what programs are running when the computer first starts. You can look through this list and see if there is any you don't think you need. If in doubt, Google the program to check it is needed. If you find one you are sure is not needed you can delete it by highlighting it and clicking Delete on the right. If you are not sure you can click Disable and if you find you did need it you can Enable it again.
CCleaner can also be used to 'clean' your computer. What this does it is removes files that are no longer needed, for example temporary files which programs create in use or files created as you browse the internet. Click on Cleaner at the top and click Run Cleaner to remove files no longer needed.
CCleaner can also check the computer 'Registry' for an issues. As you use your computer, adding and deleting programs etc this cause 'issues' that can be cleaned up and makes the computer run smoother. Click on Registry and select Scan for Issues. Once it has completed, click Fix selected issues and another window will popup asking 'Do you want to backup changes to the registry?', click No, then click Fix All Selected Issues in the next popup window. Once completed click Close.
If you are still having problems with your speed or the computer saying it is low on memory you can look at upgrading the memory. This will depend on what computer you have, if it can take more memory and if there is spare capacity. To check what you have in your computer you can download a few programs called CPU-Z from http://www.cpuid.com/softwares/cpu-z.html and install on your computer.
Once you have installed the program, double click on the icon on the desktop to run the program. Once the program is running select the tab SPD to see what memory slots are used and what is in each slot.
You may find you have a spare slot and can easily add more memory. Or you may find all your slots are used but you could replace them with larger memory sticks. You can see that the program gives you lots of details of the memory stick allowing you to look for something similar.
I hope this has helped and please feel free to get in touch with any questions and if you need a hand upgrading your memory... I'm your man!
Monday, May 26, 2014
Free Software for creating & editing images
The first program I am going to share with you is Inkscape which is available for all operating systems (Windows, Mac OS and Linux). This is a vector graphics design software, and as they say on their website, it is similar to Adobe Illustrator. You can import images, re-size them, add text on top, put images side by side and lots more.
Another benefit I've found from Inkscape is that it can open pdf files to edit them. You can only use the file in a limited way but an advantage is you can extract images from the pdf file.
Once you've designed something in Inkscape you can export it as an image to then use elsewhere. The export is only in png (portable network graphics) format but that can easily be changed to another format. For example I use Gimp, another editing software, which can change the image from png to jpg (a common form of image compression) which is more widely used.
It is great for re-sizing an image, cutting part of an image out (you can even edit people out and put them on a different background) and many more uses. You can also export the image into another format and/or export it to a lower resolution, for example to use on a website. There are loads of tutorials online for how to use different aspects of Gimp, just google what you want to do and you often find someone has documented the steps you need.
There are many tutorials online for how to use these excellent tools and I hope you have found this useful.
Here are some examples of images I have created using these programs.
Two images blended with Gimp


![[imap] folders [imap] folders](https://blogger.googleusercontent.com/img/b/R29vZ2xl/AVvXsEj8B4v0l0PRPHTvXjhCjVDzq5OzuXj5dyrRb5bEUIsXdBygbnnrn7O_GDPfO_9GM_IT0x7kc_CqNrmWw6fiEiLd9f4PY2yylkXOMlSshTMEOem43ShIXoOtW0IQbX0rDR1UWRCPjwcam6Y/w167-h200/image.png)


