I often get people contacting me saying their Windows computer is running slow and/or is saying it is low on memory. There are a few things you can do to check what the problem is and if it can be fixed. The first thing to do is right click on the bottom bar on the screen and select Task Manager. A window will appear showing what the computer is doing. Select the Performance tab to show how much memory is being used.
In this example you can see under Physical Memory it says 4085 which means the computer has 4GB and above that in the graphic display of memory you can see it is using 2.90 GB. If this graph shows it is using near the maximum or at maximum then the computer will run slow.
You can close programs down to see if it makes a difference. Start by looking at the Applications tab and close any programs that you are not using.
We now need to look at programs that are running in the 'background' which are initiated on startup. To do this you will need to download and install a program called CCleaner from http://www.piriform.com/ccleaner/download. Just download the free version and install!
After installing it will give you the option of running the program. When you run the program you can select Tools and Startup to show you what programs are running when the computer first starts. You can look through this list and see if there is any you don't think you need. If in doubt, Google the program to check it is needed. If you find one you are sure is not needed you can delete it by highlighting it and clicking Delete on the right. If you are not sure you can click Disable and if you find you did need it you can Enable it again.
CCleaner can also be used to 'clean' your computer. What this does it is removes files that are no longer needed, for example temporary files which programs create in use or files created as you browse the internet. Click on Cleaner at the top and click Run Cleaner to remove files no longer needed.
CCleaner can also check the computer 'Registry' for an issues. As you use your computer, adding and deleting programs etc this cause 'issues' that can be cleaned up and makes the computer run smoother. Click on Registry and select Scan for Issues. Once it has completed, click Fix selected issues and another window will popup asking 'Do you want to backup changes to the registry?', click No, then click Fix All Selected Issues in the next popup window. Once completed click Close.
If you are still having problems with your speed or the computer saying it is low on memory you can look at upgrading the memory. This will depend on what computer you have, if it can take more memory and if there is spare capacity. To check what you have in your computer you can download a few programs called CPU-Z from http://www.cpuid.com/softwares/cpu-z.html and install on your computer.
Once you have installed the program, double click on the icon on the desktop to run the program. Once the program is running select the tab SPD to see what memory slots are used and what is in each slot.
You may find you have a spare slot and can easily add more memory. Or you may find all your slots are used but you could replace them with larger memory sticks. You can see that the program gives you lots of details of the memory stick allowing you to look for something similar.
I hope this has helped and please feel free to get in touch with any questions and if you need a hand upgrading your memory... I'm your man!
Sunday, August 10, 2014
Monday, May 26, 2014
Free Software for creating & editing images
I often create business cards or leaflets for people and business. Today it is so easy to have your own business card and many companies like Vista Print offer their own design solutions for you. However, if you really want to make it unique you can create your own with some amazing software that is free!
The first program I am going to share with you is Inkscape which is available for all operating systems (Windows, Mac OS and Linux). This is a vector graphics design software, and as they say on their website, it is similar to Adobe Illustrator. You can import images, re-size them, add text on top, put images side by side and lots more.
Another benefit I've found from Inkscape is that it can open pdf files to edit them. You can only use the file in a limited way but an advantage is you can extract images from the pdf file.
Once you've designed something in Inkscape you can export it as an image to then use elsewhere. The export is only in png (portable network graphics) format but that can easily be changed to another format. For example I use Gimp, another editing software, which can change the image from png to jpg (a common form of image compression) which is more widely used.
Gimp is an image manipulation program which can be used for photo retouching, as well as many other uses. It is similar to Adobe Photoshop and can do most things that Photoshop can do.
It is great for re-sizing an image, cutting part of an image out (you can even edit people out and put them on a different background) and many more uses. You can also export the image into another format and/or export it to a lower resolution, for example to use on a website. There are loads of tutorials online for how to use different aspects of Gimp, just google what you want to do and you often find someone has documented the steps you need.
There are many tutorials online for how to use these excellent tools and I hope you have found this useful.
Here are some examples of images I have created using these programs.
Two images blended with Gimp

The first program I am going to share with you is Inkscape which is available for all operating systems (Windows, Mac OS and Linux). This is a vector graphics design software, and as they say on their website, it is similar to Adobe Illustrator. You can import images, re-size them, add text on top, put images side by side and lots more.
Another benefit I've found from Inkscape is that it can open pdf files to edit them. You can only use the file in a limited way but an advantage is you can extract images from the pdf file.
Once you've designed something in Inkscape you can export it as an image to then use elsewhere. The export is only in png (portable network graphics) format but that can easily be changed to another format. For example I use Gimp, another editing software, which can change the image from png to jpg (a common form of image compression) which is more widely used.
It is great for re-sizing an image, cutting part of an image out (you can even edit people out and put them on a different background) and many more uses. You can also export the image into another format and/or export it to a lower resolution, for example to use on a website. There are loads of tutorials online for how to use different aspects of Gimp, just google what you want to do and you often find someone has documented the steps you need.
There are many tutorials online for how to use these excellent tools and I hope you have found this useful.
Here are some examples of images I have created using these programs.
Two images blended with Gimp
Business card created using Inkscape
Background changed and round corners added to a photo using Gimp

Monday, March 17, 2014
Windows XP ending - what to do?
On April 8th 2014 Microsoft will stop supporting Windows XP. This means there will no longer be updates, especially security updates which stop people 'hacking' your system. So,what should you do?
You can continue using Windows XP and although you will initially have no issues, eventually you will. Other software that you use may stop working properly or you may have problems accessing websites and other online services. The biggest problem you might have is security, as hackers will be targeting this version.
My advice, if you can upgrade to Windows 7 or 8, if your computer can run it. You can check the minimum requirement at this link for 7 and this link for 8. If your computer can not run Windows 7 or 8 there are some great deals on new computers (get in touch if you need some advice).
But if you are not able to do that or just want to keep the old computer there is another operating system that you could use, called Linux. Linux is free and many of the versions you can get are very easy to install. You can try them before you install, using what is called a LiveDVD or LiveCD. This allows you to run the operating system from the disk without installing it on the computer. You can then see if you like it and check that it will work with your computer.
One version of linux which can look similar to Windows XP in setup is Zorin. The minimum requirements to run this are:
1 GHz processor
512MB Ram
5GB Hard Drive
When you try the the LiveDVD version, it will run slower than when it is installed on the computer (as it is running from the DVD) but it will give you an idea how well it will work.
Yet another version of Linux which is very similar to the layout of Windows XP is LXLE. This is based on the Ubuntu linux operating system. It uses less processing power and the minimum requirements to run this are:
Pentium 3 or newer
512MB Ram
Again you can try running the operating system from the disk before installing it.
Before you install the operating system you will need to copy all your files to somewhere that you can access after installing it. One option is using Google Drive which was detailed in my previous blog Moving to the 'Cloud' or Dropbox or an external drive to back up your files. This will depend on how many files you have. Remember to copy files that might not be obvious, like bookmarks.html (I've made the mistake of not doing that and lost all my bookmarks!).
There are many other versions of linux you can use, so have a good look and see what there is. Ubuntu, which I mentioned earlier, is another great product but looks a lot different from Windows, so may put people off. Another version I can recommend is Linux Mint and you can look at many more at Distowatch.
If all this seem too much for you, I am available so feel free to get in touch!
Friday, March 7, 2014
Moving to the 'Cloud'
We are now not limited to carry around our files on a usb stick (it was a floppy disk not so many years ago)! You can now use the 'cloud'. What this means is we can put our documents on the internet and be able to get access to them from anywhere.
Many of you will have Gmail and what this also gives you is Google Drive which is an online storage of 15GB with a free Gmail account. If you haven't got a Gmail account, it's free and you can incorporate your other email address(es) into the one place.
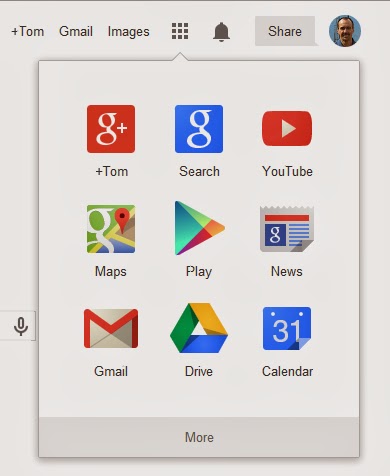
So how do you use this facility and what are the benifits? Using a web brower, like Chrome, go to google.com and sign into your Google account. Then near the top right of the screen you will see a square made of 9 smaller squares (see image below).
 Click on the square and a drop down menu will appear. Click on the Drive icon to take you to your drive. You may see some documents there, they will have been added when you used the drive to view files in your Gmail, so you might recognise the names.
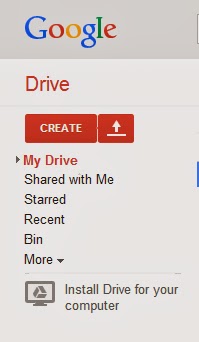
You can now create a folder using the CREATE button in red on the left and upload using the upload button beside the CREATE button (see image below).
You can also download a program to your computer which will add Google Drive to you computer. This makes it easier to access the files. The files will be stored on your computer and on Google Drive, so you can use them when you do not have internet access. To download the program click on the 'Install Drive for your computer' (see image below).
 The benefits are that you can get access to your documents anywhere you have internet access, even on your smartphone or tablet! Google has created apps for Andriod and Apple devices so you can use these to access your documents anywhere. You can also get access to your documents through other computers. E.g. this would allow you to print at the library or a friends house.
Of course the other obvious benefit is if your computer fails your documents are safely stored on your Google Drive and so instantly available without having to recover them from your broken computer.
You are also able to share folders and documents with other Gmail users allowing you to collaborate on projects or just share files easily.
Google are very serious about security (their business depends on it), so you can be confident your files are safe. Many businesses are moving to this platform as it takes away the need for servers etc.
I hope you have found this helpful. Google have more information available including video tutorials, so you can Google "Google Drive" for more info or contact me if you need help!
Many of you will have Gmail and what this also gives you is Google Drive which is an online storage of 15GB with a free Gmail account. If you haven't got a Gmail account, it's free and you can incorporate your other email address(es) into the one place.
So how do you use this facility and what are the benifits? Using a web brower, like Chrome, go to google.com and sign into your Google account. Then near the top right of the screen you will see a square made of 9 smaller squares (see image below).
 Click on the square and a drop down menu will appear. Click on the Drive icon to take you to your drive. You may see some documents there, they will have been added when you used the drive to view files in your Gmail, so you might recognise the names.
You can now create a folder using the CREATE button in red on the left and upload using the upload button beside the CREATE button (see image below).
You can also download a program to your computer which will add Google Drive to you computer. This makes it easier to access the files. The files will be stored on your computer and on Google Drive, so you can use them when you do not have internet access. To download the program click on the 'Install Drive for your computer' (see image below).
 The benefits are that you can get access to your documents anywhere you have internet access, even on your smartphone or tablet! Google has created apps for Andriod and Apple devices so you can use these to access your documents anywhere. You can also get access to your documents through other computers. E.g. this would allow you to print at the library or a friends house.
Of course the other obvious benefit is if your computer fails your documents are safely stored on your Google Drive and so instantly available without having to recover them from your broken computer.
You are also able to share folders and documents with other Gmail users allowing you to collaborate on projects or just share files easily.
Google are very serious about security (their business depends on it), so you can be confident your files are safe. Many businesses are moving to this platform as it takes away the need for servers etc.
I hope you have found this helpful. Google have more information available including video tutorials, so you can Google "Google Drive" for more info or contact me if you need help!
Wednesday, March 5, 2014
Creating PDF's
Adobe PDF (portable document files) are often the best way of sharing documents because anyone can open them but they are not able to edit them easily.e.g. If you send an invoice, you don't want it being tampered with! Many companies use the same format for this reason.
Nowadays it is easy to create these documents, making them look very professional, thus creating a good image for your customer. So let me show you how to do this in very easy steps using two programs: LibreOffice and Microsoft Office. I will start with LibreOffice (which is free and I presonally think is almost as good as Microsoft Office). There are other method's of making pdf versions of documents you create and I would encourage you to search them out if this does not help you. You are also welcome to contact me to see if I can help.
This is the easiest step. Instead of saving the document you are going to Export it as a pdf. So click on on File in the top left and a menu will appear (see image below).
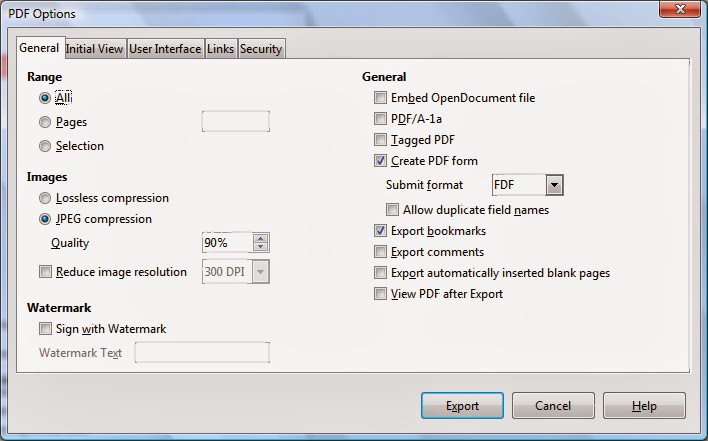
Move down and select Export as PDF, this will then open a new window where you will get some options. In most cases you just need to select Export and a new box will
appear giving you the option to change the file name. Just click Save if you want the filename suggested or change the filename, but keep the .pdf at the end.

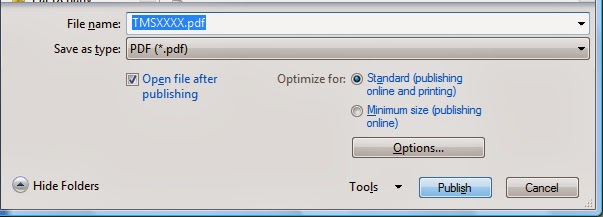
Once you have selected this option another screen will appear giving you the option to change the filename. As with LibreOffice you can leave it as the default or change it but keep the .pdf at the end. Then just click Publish (see below).

You have now created your pdf version to send to your customer! Well Done!!!
Nowadays it is easy to create these documents, making them look very professional, thus creating a good image for your customer. So let me show you how to do this in very easy steps using two programs: LibreOffice and Microsoft Office. I will start with LibreOffice (which is free and I presonally think is almost as good as Microsoft Office). There are other method's of making pdf versions of documents you create and I would encourage you to search them out if this does not help you. You are also welcome to contact me to see if I can help.
LibreOffice
Start by creating a document in LibreOffice using Writer (you can also use Draw which is great software for creating leaflets or newspaper style documents). Once you have made the document look how you want it. This is a great opportunity to use your creative gift! You are now ready to make the pdf.This is the easiest step. Instead of saving the document you are going to Export it as a pdf. So click on on File in the top left and a menu will appear (see image below).
Move down and select Export as PDF, this will then open a new window where you will get some options. In most cases you just need to select Export and a new box will
appear giving you the option to change the file name. Just click Save if you want the filename suggested or change the filename, but keep the .pdf at the end.

Microsoft Word
New versions of Microsoft Word (2007 on) allow you to save the file as a pdf. Similar to LibreOffice, create a document and once you are happy with how it looks you are ready to make a pdf. In Word select Save As but instead of saving as Word or similar choose the option PDF or XFS (see image below).Once you have selected this option another screen will appear giving you the option to change the filename. As with LibreOffice you can leave it as the default or change it but keep the .pdf at the end. Then just click Publish (see below).

You have now created your pdf version to send to your customer! Well Done!!!
Subscribe to:
Comments (Atom)


